
Table of Contents
- Why Standard Storage Fails in a Moving Van
- Custom Van Storage for Golf Bags: Key Design Decisions
- Secure Golf Bag Mounting Systems That Actually Work
- Van Interior Layout for Golf Teams: Seating and Gear
- How to Evaluate Best Custom Vans for Golf Trips
- DIY vs. Professional Installation: What to Know
- Conclusion: Build Your Mobile Clubhouse
- Frequently Asked Questions
Last Updated: September 6, 2026
Every golfer who has braced clubs against a rolling duffel bag mid-drive knows standard storage fails in a moving van. Custom van storage anchors equipment to the vehicle itself, and the difference comes down to how well storage integrates with the van’s structure.
Why Standard Storage Fails in a Moving Van
The physics of a moving vehicle work against loose gear. Every acceleration, corner, and pothole transfers energy to unsecured objects, causing clubs to shift, rattle, and collide, scratching graphite shafts, dinging club heads, and wearing down grips.
Standard cargo solutions, like bungee cords and generic utility racks, were not designed for the geometry of golf bags. A tour-style bag sits differently than a slim stand bag, and neither fits securely against a flat van wall without custom fabrication.
The issue is not space alone; a van conversion has plenty of cubic feet. The real challenge is controlling movement within that space.
Custom Van Storage for Golf Bags: Key Design Decisions
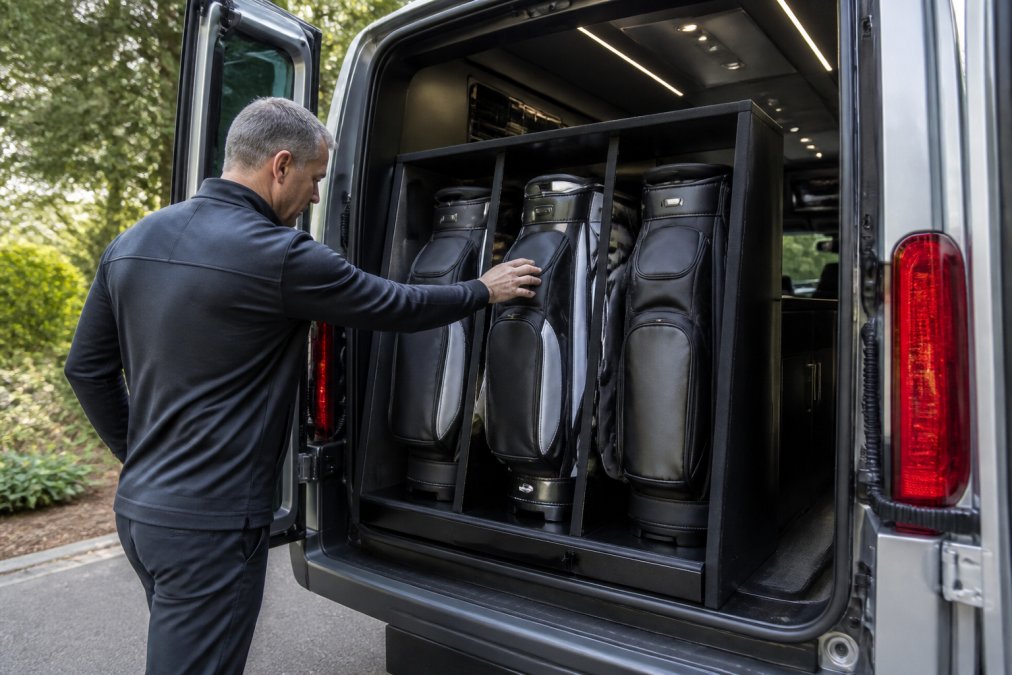
Custom van storage begins with two fundamental choices: orientation and materials, which determine how many bags fit, how easily they load, and whether the system survives years of road travel.

The best custom van storage prioritizes accessibility. If you have a bad back or limited mobility, you need a system that brings the clubs to you rather than requiring a deep bend into a dark compartment.
Vertical vs. Horizontal Configurations
Vertical storage is the dominant choice for most van conversions. Bags stand upright on their bases, secured at the top, keeping club weight distributed along the bag’s natural axis and minimizing the footprint per bag.
Horizontal storage lays bags flat along a shelf or drawer system, working when ceiling height is limited or when you want bags out of sight for theft deterrence. The trade-off is accessibility: retrieving a bag from a low drawer requires more bending and pulling.
A common mistake is choosing vertical storage without considering bag height. Tall driver heads and staff bags vary by several inches, so measure your actual bags before committing.
Material Selection for Mobile Durability
Materials in a moving van face constant vibration, temperature swings, and moisture. Plywood with a marine-grade finish handles humidity well; aluminum framing offers strength without excessive weight.
Non-slip coating on compartment floors prevents bags from sliding. Cushioned storage, such as closed-cell foam lining, absorbs vibration and protects club heads. Lighter materials in upper cabinets keep the vehicle’s center of gravity low, improving handling.
Secure Golf Bag Mounting Systems That Actually Work
Secure golf bag mounting systems fall into three categories: compression clamps, strap-based retention, and quick-release bases. The real question is whether the mounting points can handle the forces of a moving vehicle without becoming a projectile hazard.
The Load-Bearing Math Most Builders Skip
A single tour-style bag with a full set of clubs weighs between 30 and 40 pounds. Add shoes, rain gear, and a rangefinder, and you’re looking at 50 pounds per bag. For a foursome, that’s 200 pounds of gear needing restraint, before accounting for dynamic driving forces.
Under a hard brake from highway speed, the force on an unsecured object multiplies by roughly 4 to 5 times its static weight (nhtsa.gov). A 40-pound bag exerts 160 to 200 pounds of forward force during an emergency stop, and a pothole at 55 mph can generate vertical acceleration spikes of 3 G or more.
Most DIY mounting systems, and even some professional ones, anchor into thin sheet metal wall panels never designed for structural loads. A typical van wall panel is 18-gauge steel, roughly 0.048 inches thick (engineeringtoolbox.com). Screws threaded into that material will pull out under repeated stress. The correct approach is to bolt into the van’s structural ribs, seat belt anchor points, or floor-mounted D-rings rated for aviation or motorsport use.
Hardware That Actually Holds
Compression clamps work well when they grip the bag body across a wide surface area. Look for clamps with at least 4 inches of contact width and rubber-faced jaws that distribute pressure without crushing graphite shafts, using a ratcheting mechanism with a locking pawl rather than a friction knob that can vibrate loose.
Strap-based retention systems should use 2-inch wide polyester webbing with a minimum breaking strength of 1,800 pounds, the same spec used in commercial cargo tie-downs (fmcsa.dot.gov). The anchor points matter more than the strap: bolt them into the van floor using Grade 8 hardware with backing plates that spread the load across at least 4 square inches.
Quick-release base plates are the most convenient option, but they introduce a failure point: the locking mechanism itself. A spring-loaded latch with a positive mechanical stop is preferable to a magnetic or friction-fit design. Test the release mechanism with the bag loaded, a plate that releases easily when empty can bind under a full bag’s weight.
Vibration: The Silent Club Killer
A bag that cannot slide but still vibrates will transfer that energy directly to its contents. Graphite shafts are particularly vulnerable; sustained vibration at resonant frequencies can cause micro-cracks that eventually lead to catastrophic failure mid-swing.
The fix is isolation. Mounting brackets with rubber isolation bushings between the bracket and the van body reduce transmitted vibration by up to 60 percent compared to direct metal-to-metal contact. Closed-cell foam lining on compartment walls adds another layer of dampening. For high-value sets, consider a suspension-style cradle that holds the bag at four points with elastomeric isolators.
Do not rely on the bag’s own stand or legs for security. Retractable legs are not load-bearing structures and will fold or snap under the forces of a moving vehicle. Always secure the bag body, not its appendages.
The Hidden Risk: Center of Gravity
Where you mount the bags changes how the van handles. Golf bags are dense, and mounting them high on a wall raises the vehicle’s center of gravity, making it more prone to body roll in corners and unstable in crosswinds.
The rule of thumb used by professional van converters is to keep the heaviest items below the beltline, the horizontal line running along the bottom of the side windows. For every 10 pounds of gear mounted above that line, the van’s roll moment increases by roughly 1 percent. Four bags mounted high can degrade handling noticeably, especially in a tall-roof conversion.
If you must store bags vertically, position them as low as possible and lean them slightly toward the center of the van rather than against the outer walls, keeping the combined center of gravity closer to the vehicle’s longitudinal axis.
A Practical Load Test You Can Do
Before you trust any mounting system, perform a simple test. Load the bags, secure them, and drive a route with several hard stops, sharp corners, and a few potholes. Mark the bolt heads with a paint pen before the drive; if the marks have shifted, the hardware is loosening. Re-torque and retest. This 20-minute procedure catches more failures than any visual inspection.
For professional installations, ask the builder whether they perform dynamic load testing and what their hardware specifications are. A builder who can quote specific bolt grades, webbing strengths, and anchor points has done the engineering; one who says “it’ll hold fine” without specifics is guessing.
Van Interior Layout for Golf Teams: Seating and Gear
A van interior layout for golf teams must balance passenger comfort with equipment capacity. For a foursome, this typically means two or three rows of seating with rear-end storage dedicated to bags. For larger groups or professional coaches, a mobile command center layout with a fold-down table for strategy discussions works well.
The integration challenge is weight distribution. Golf bags are heavy, and placing them all behind the rear axle creates a lever effect that unsettles the vehicle. Distributing bags along the side walls, between wheel wells, or under a raised rear platform keeps the center of gravity forward and stable.
Space optimization also means planning for non-club gear: shoes, rain suits, range finders, and coolers. Modular storage systems with removable dividers adapt as the passenger count and gear load changes between trips.
How to Evaluate Best Custom Vans for Golf Trips
Finding the best custom vans for golf trips requires evaluating the builder’s integration quality, not just the flashy interior photos. Ask how the storage attaches to the vehicle’s structural ribs. A system bolted to thin wall panels will loosen over time; one tied into the frame or reinforced pillars will not.
Consider the platform. Vans built on Chevrolet and GMC platforms offer widespread service availability, which matters when you are far from home with a van full of clubs. A builder with decades of experience understands how to route mounting hardware without compromising the vehicle’s safety systems.
Garage storage is another practical factor. Measure your garage door height before committing to a high-roof van, and confirm the builder can spec an exterior height that fits your parking situation.
DIY vs. Professional Installation: What to Know
DIY installation appeals to the handy owner, and basic strap-and-rail systems are within reach of most workshops. The risk comes with load-bearing calculations. A van wall is not a garage wall; it has wiring, airbags, and structural zones that must not be compromised.
The Integration Problem Nobody Mentions
Most van owners don’t start with an empty cargo van. They start with a conversion that already has a kitchenette, a bed platform, or factory-installed cabinetry. The challenge isn’t building a golf storage box from scratch, it’s fitting one into the spaces that remain without compromising existing systems.
A typical Sprinter or Ford Transit conversion has wheel wells that intrude into the cargo area, electrical runs along the walls, and a floor that may already be finished with plywood and vinyl. Drilling into that floor without knowing what’s underneath can puncture a fuel line, hit a wiring harness, or compromise corrosion protection. Professional converters use stud finders and borescopes to map what’s behind the panels before they cut.
The Retrofitting Approach: Working With What You Have
If you already have a van conversion with cabinetry, the smartest approach is often retrofitting rather than replacing. A pull-out drawer system that slides into an existing cabinet bay can hold two golf bags horizontally without altering the cabinet’s exterior, preserving the van’s aesthetic while adding function.
The key measurement is the drawer slide. Full-extension slides rated for 100 pounds or more per pair are essential, golf bags are heavier than most people expect, and a standard 50-pound drawer slide will sag within months. Look for slides with ball bearings and a minimum of 1 inch of side space for mounting.
For vertical storage in an existing cabinet, the constraint is usually height. A standard golf bag with driver is between 48 and 52 inches tall. If your cabinet has less than that, you’re looking at horizontal storage or a custom extension that protrudes into the living space. Remember that the bag’s height includes the headcovers, a 48-inch interior dimension will not fit a bag with a bulky driver cover.
The Cost Reality Check
DIY strap-and-rail systems run between $50 and $150 in materials. A plywood compartment build costs $200 to $500 depending on hardware and finish quality. Professional installation typically runs $1,500 to $5,000 depending on design complexity and materials.
The gap isn’t just labor, it’s engineering. A professional build includes load-spreading backing plates, vibration isolation, and integration with the van’s existing structure, plus finish work: upholstered panels, edge banding, and carpet that matches the van’s interior.
The Rattle Factor
Here’s the thing nobody tells you about DIY builds: the finish. Sealing edges, matching upholstery, and creating a rattle-free fit takes hours of trial and error. Every joint is a potential squeak source. Every screw can back out over time. Every panel can develop a buzz at certain engine RPMs.
Professional builders use several techniques to eliminate rattles that DIYers rarely know about: thread-locking compound on every fastener, felt or foam tape between every mating surface, captive nuts or rivet nuts rather than sheet metal screws, and test-driving the finished build to identify and eliminate buzzes before delivery.
When DIY Makes Sense
DIY is the right choice when you have one bag, travel occasionally, and don’t mind a utilitarian look. A simple two-strap system anchored to the floor with rated D-rings will keep a single bag secure for weekend trips.
DIY is the wrong choice when you have multiple bags, a high-value set of clubs, or a van interior you care about aesthetically. The risk of damage to the clubs, or to the van itself, outweighs the cost savings. A single cracked graphite shaft costs $300 to $500 to replace; a damaged van wall panel costs more.
The Professional Standard
Professional installation brings custom fabrication skills that DIY kits lack. Builders can mold compartments to the exact contours of the wheel wells and roofline, maximizing every inch of the vehicle interior, and handle integration with existing van cabinetry for a cohesive look.
| Approach | Best For | Key Trade-Off |
|---|---|---|
| DIY strap systems | Occasional travelers, single bag | Low cost, but limited security and vibration control |
| DIY plywood builds | Skilled woodworkers | Custom fit, but heavy and hard to finish cleanly |
| Retrofitting existing cabinets | Van owners with current conversions | Preserves interior look, but requires precise measurements and slide hardware |
| Professional installation | Frequent travelers, teams, luxury buyers | Higher investment, but engineered load security and warranty-backed work |
Before you commit to either path, ask yourself three questions: How many bags do you carry? How much is your set worth? And how much do you care about how the van looks when the doors open at the club? The answers will tell you which approach is right.
Conclusion: Build Your Mobile Clubhouse
The gap between a cargo van with loose bags and a purpose-built mobile clubhouse is engineering. Custom van storage protects your investment in clubs, keeps the interior organized for passengers, and turns travel days into part of the experience rather than a chore to endure.
GOLF Cruiser builds these systems on reliable Chevrolet and GMC platforms, hand-crafted by American experts with over 45 years of experience. Whether you need a flexible layout for golf buddies or a tournament command center for a full team, the storage integrates seamlessly with the luxury interior. Contact us today to design a van that gets you and your clubs to the course in style.
Frequently Asked Questions
How do you store golf bags in a van without damaging clubs?
Secure each bag individually with a quick-release mounting system that grips the bag body, not just the handle. Use cushioned compartments lined with non-slip coating to prevent lateral movement and vibration dampening at the base. Never stack bags on top of each other. A custom rack that holds each bag upright or at a slight angle keeps weight off the shafts and protects club heads during transit.
Can you fit multiple golf bags in a custom luxury van?
Yes. A well-planned van interior layout for golf teams typically accommodates four to six tour-style bags with dedicated compartments. The key is designing the storage around the specific bag dimensions. Tour-style bags and staff bags are larger than stand bags, so measure the base diameter and overall height before building the rack. Vertical storage against the interior wall maximizes floor space for passengers.
What materials are best for custom golf bag racks in vehicles?
Use powder-coated aluminum or marine-grade plywood sealed with a durable finish for the frame. These materials resist vibration and humidity changes better than standard particle board. Add closed-cell foam padding at every contact point and a non-slip coating on the base. Use heavy-duty straps with metal buckles rather than plastic clips, which can become brittle in extreme temperatures and fail during transit.